ASPL Manual v 1.00
© 2024 by SetSphere.COM
The ASPL calculator has many features that distinguish it from any other calculator as it is capable to do different type of operations: set operations, sequence alignment operations, and similarity calculation. Furthermore it provides special instructions to partition the sets according to their elements, to their element checksums, or to their subgroups. It also has operators to do fuzzy matching and shallow matching through intermediate filters and preprocessor routines. The power of ASPL stems in its algorithmic routines that turn a group and whatever it contains as subgroups and elements into a sequence of containment pathes that are effectively compared and displayed on the screen of a data analysts.
The set operations are performed by symbolic mnemonics, called setops, that acts on dataset objects whether they are saved on the stack or assigned to variables. Likewise, the sequence operations have their own symbolic mnemonics, called seqops, that align dataset objects. The similarity command, or its abbreviation sim, calculates the similarity by breaking the datasets into their consistuent words, then analyzing them through mining routines, before being saved and displayed on your terminal.
Two main keys features distinguish the ASPL interpreter from any other software: the first is its interactive capability allowing you to view and save objects by issuing commands on the interpreter prompt, and the second is its colorful and semantical visualization capability that clearly display datasets for a comprehensive comparative analysis. Therfore ASPL is a software that covers the two main subjects for data analysts: Interactive Objects for Data Analysis, and Visualize Data for Objects Analysis.
Hence ASPL is the first interpreter to provide a setadic symbolic language to collect various datasets and to do comparative analysis on them. The datasets whether they are assigned to variables or saved locally on a stack, you can compare and contrast them to see their similarities and differences.
The previous chapter introduced the basic components of ASPL and how to start the ASPL interpreter. This chapter shows shows you how to get started using ASPL and howto to explore with some of its powerful set operations.
The ASPL interpreter is shipped with various sample workspaces, in this chapter we will demonstrate the analytical power of ASPL by using the following workspaces: TRIVIAL, RANDONEBIT, RANDONEBITMIX, CRAPTABLE, and WS1.
The first paragraph introduces the TRIVIAL workspace as it encompasses the simplest dataset that contains nothing but the least element in a group. The second paragraph introduces the RANDONEBITMIX workspace where a group is randomly build to show the canonical representation of a mixed dataset that parallel the group shown in Figure 1 of the previous chapter. The third paragraph uses the CRAPTABLE workspace where a simulation of three players tossing dice on craptable is used to show the usage of ASPL set operations, sequence operations, similarity calculation, along other basic commands.
The rest of the paragraphs address some key nomenclature and the symbolic notation adopted in ASPL operators.
■ The TRIVIAL Workspace
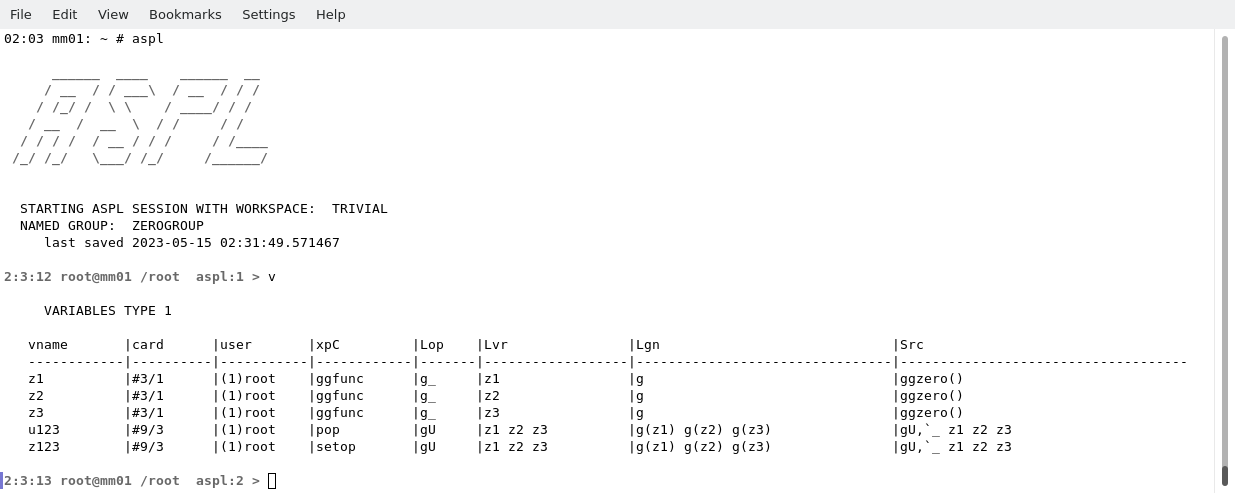
When you start ASPL for the first time (* footnote: assuming you did not modify its default configuration.) the interpreter is started by loading the TRIVIAL workspace, then you will be presented with a prompt where you can issue commands to interact with the interpreter. You can also start ASPL by loading the TRIVIAL workspace explicitly:
# aspl -wsname TRIVIAL -groupingclass ZEROGROUP
Note: Starting ASPL with the TRIVIAL Workspace trivial-v.png
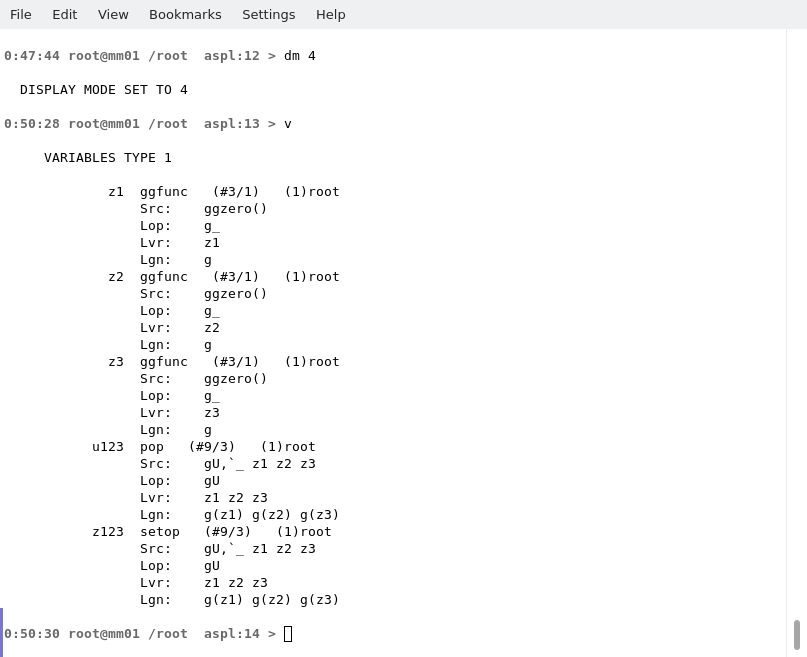
Looking at Figure FFFF, the following lists each column and what it contains:
Note: trivial-dm4.png
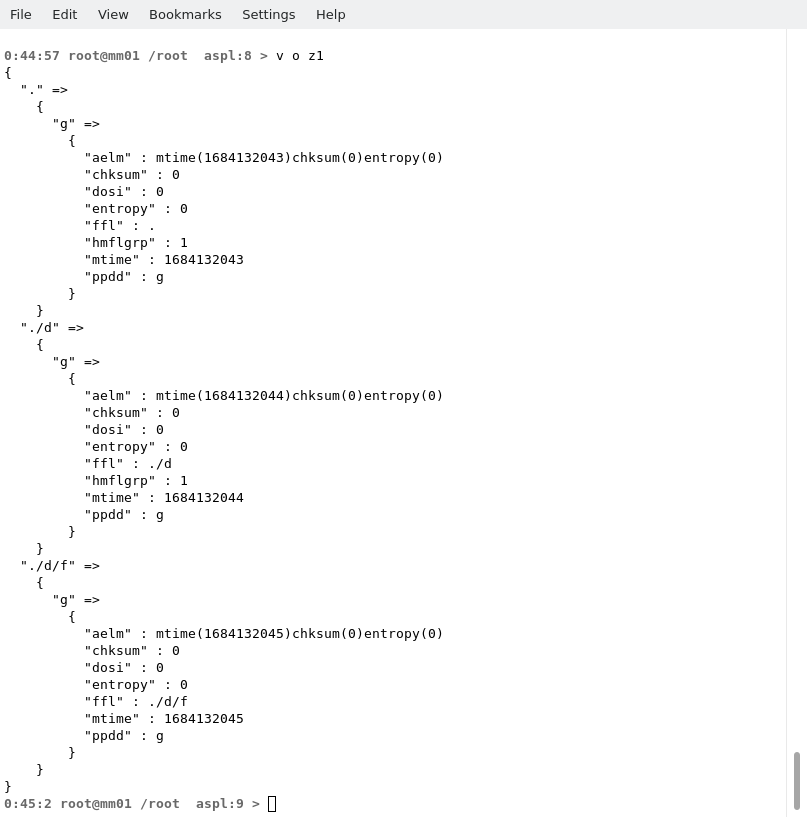
To display the structure of variable z1, we will issue the command v o z1 to view the object contents.
Note: trivial-voz1.png
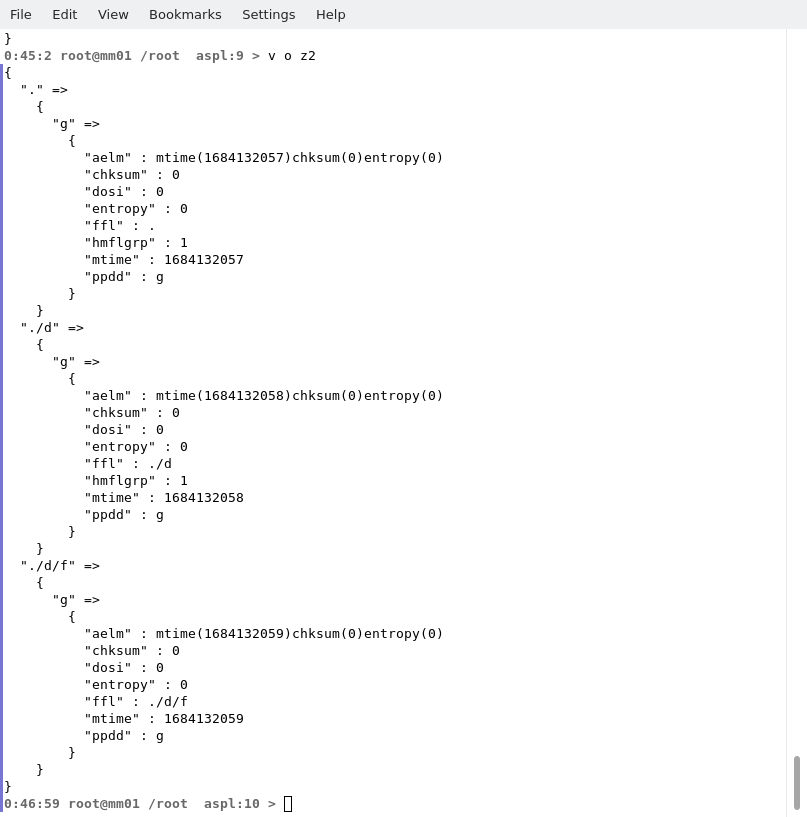
Note: trivial-voz2.png
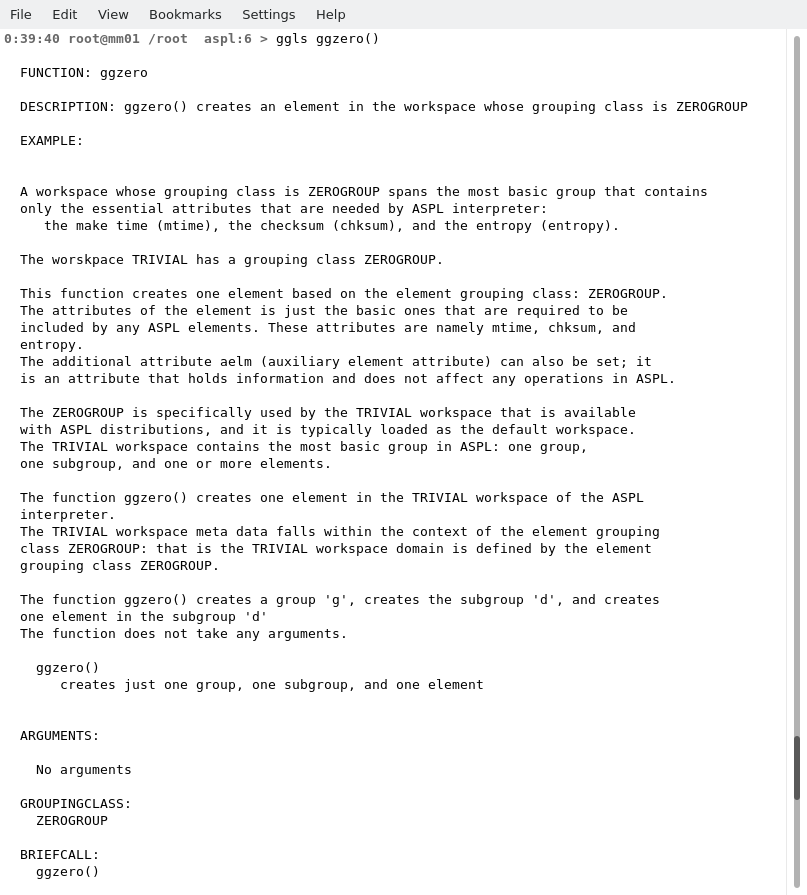
This shows the layout of the object that represents the variable z1. If you repeat the operation to view the object that represents z2, you will notice that both objects are similar except for the mtime attribute depicting when the elements were made or modified. The mtime is a common attribute to all elements and subgroups in ASPL. The variables in the TRIVIAL workspace are created with the grouping function: ggzero(). The variables contain the basic object of the ZEROGROUP. you can view the ggzero() description by issuing the command ggls ggzero().
Note: trivial-ggzero.png
Let's get the union of the groups defined in the variables z1, z2, and z3:
aspl> gU z1 z2 z3
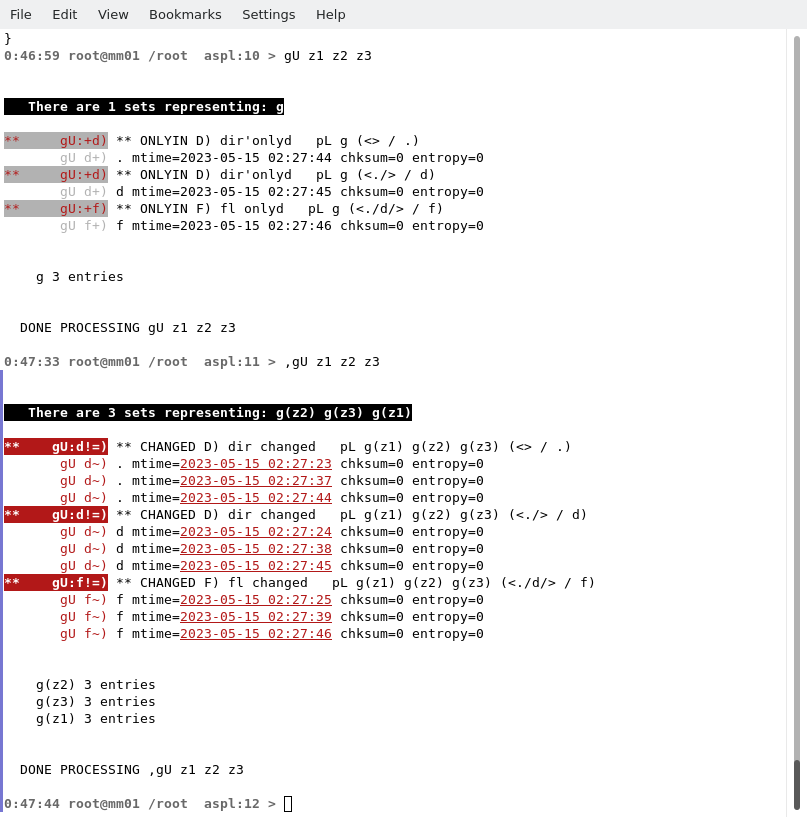
The result seems deceiving because some of the object labels overlapped (that is all three variables have the same group label and this is shown in column 7 when we displayed the symbol table). ASPL introduces a new term to relabel colliding names: the term labination means relabeling, that is to relabel by affixing the variable name to a group label. We will use the verb to labinate to mean to relabel the names in a dataset represented by a set variable: each group label is therefore suffixed with the opening parenthesis '(' followed by the variable name followed by the closing parenthesis ')'.
ASPL uses the comma operator as the labination operator, and when the comma is placed directly before or after a set operator then the group labels of the variables following it are being labinated. Labination is important in situations where a set operator is applied on set variables that have identical label name, without labination the keys of the hash objects will be overriden causing loss of information and confusion in the final result of the set operations.
We will repeat the previous command, but now we will add the comma either before or after the set operator: ,gU z1 z2 z3 or gU, z1 z2 z3.
Placing the comma after the set operator causes the operation result to be pushed on the answer stack, you can repeat the operations and issue the command ans after each of them. Notice that the answer stack is only updated when the labination comma is placed after the set operator.
When we assign the result to a variable, then the position of the labination operator (comma) is not important and the following two statements are equivalent:
  i12 = ,fU z1 z2
  i12 = fU, z1 z2
and in either case the operation causes the relabeling of the names and the results is always pushed on the stack.
Some ASPL operatorrs automatically labinate the variables by suffixing their group label in various ways. The density command automatically labinates multiple set variables before resolving their density, and so does the similarity command, yet some set operators do not labinate the variables as is the case with f&. ASPL will attempt to find out if there is a name collision in the label name and try to advise you about that. Inspect the variables by looking at the Lgn column, and labinate the set operator if some label is common.
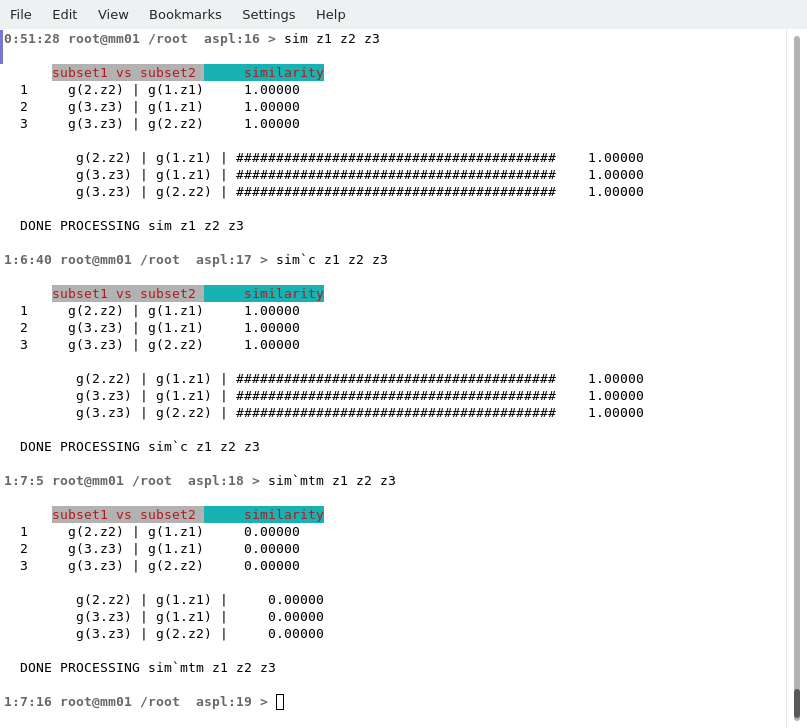
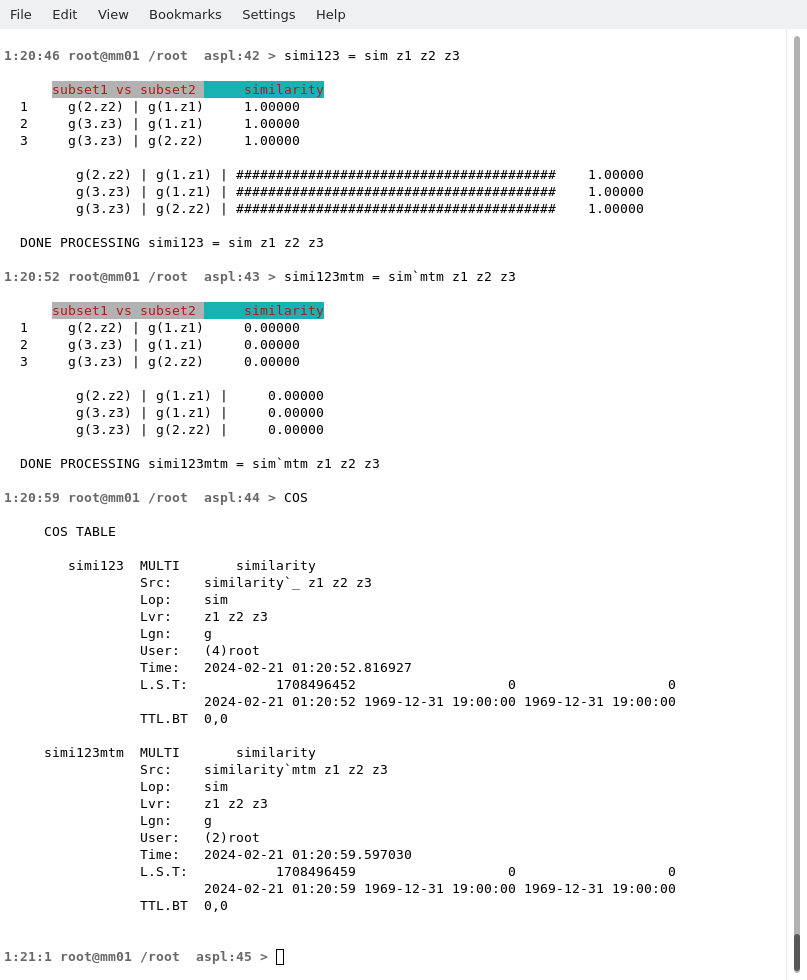
The similarity operation sim z1 z2 z3 always labinates the datasets with the variable position number along the variable name. Figure FFFF shows the similarity operation revealing that all three variables are similar. However the command sim
`mtm z1 z2 z3 shows that all three variables are completely different, with zero similarity, because
the mtime was introduced as a predicate saying: "get the similarity such that the mtm is the same".
Note: trivial-sim.png
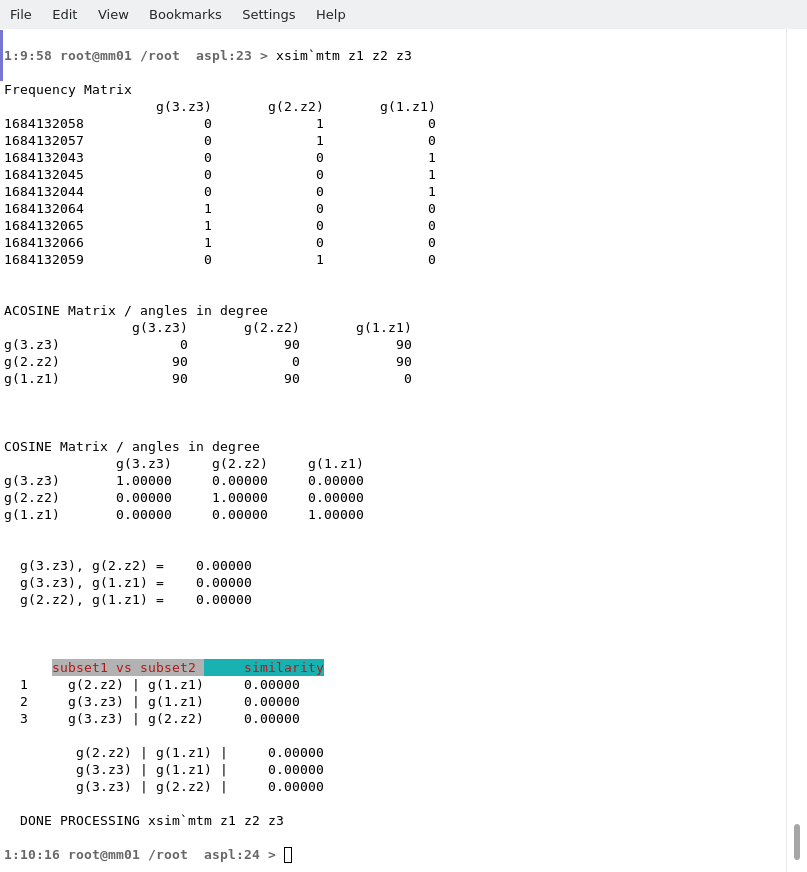
The similarity provides a compact way to compare datasets. One can also display the similarity in an extended format by using the xsim command. The command xsim
`mtm z1 z2 z3 displays the extended similarity calculation table.
Note: trivial-xsim.png
You can assign the similarity to a variable and ASPL will save it in the COS symbol table. The following figure FFFF shows the COS table after assigning the similarities calculation to variables: simi123 and simi123mtm.
Note: trivial-cos.png
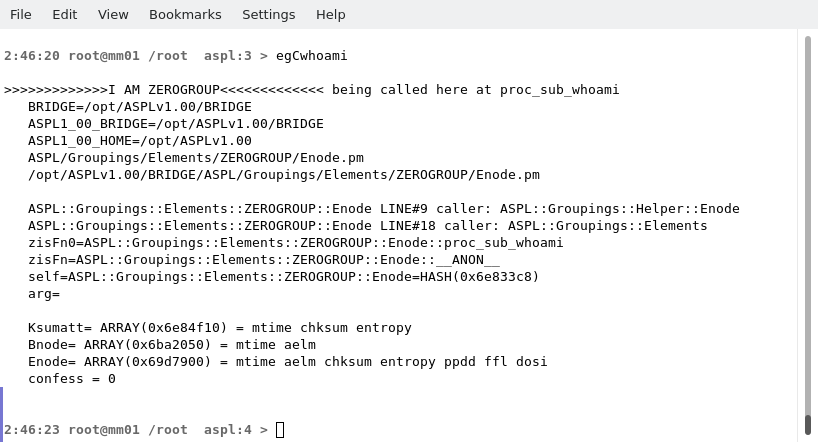
To conclude this section, as the last command, we will ping the element grouping container for the currently loaded workspace. The commad egCwhoami pings the container as shown below:
Note: TRIVIAL Pinging the Element Grouping Class Container with egCwhoami trivial-egCwhoami.png
Notice the reply of ping command: "I AM ZEROGROUP". This is ASPL reply from its grouping container saying that the ZEROGROUP is alive for the current ASPL session. Each workspace is loaded within the domain of its own grouping class that is because the groups, subgroups, and elements have their metadata attributes defined within that domain, hence the grouping class is also called the element grouping class container. This container is pingable using the egCwhoami command at the ASPL prompt. ASPL containment is discussed in the chapter "ASPL A DETAILED VIEW". Looking at figure FFFF the two symbols Ksumatt and Enode defined as two list of elements:
Ksumatt = mtime chksum entropy
Enode = mtime aelm chksum entropy ppdd ffl dosi
The Enode represents the least named attributes, that is any grouping class in ASPL must contain the following attributes: mtime aelm chksum entropy ppdd ffl dosi. That is the common factor by all grouping classes are these aforementioned. However additional attributes can be added to a grouping class as will be shown in the next section. In particular the element-grouping-class ZEROGROUP contain nothing more than the least attributes. When creating a plain grouping class that has no attributes, ASPL will automatically add these attributes.
Ksumatt represents the current active ks-vector, it is used within ASPL routines, e.g. when processing predicates, and this vector can be displayed or altered by using the ks command.
■ The RANDONEBIT Workspace
The simulation for creating objects that represent random groups, subgroups, and elements along their arbitraty assigned attributes is realized in the sample workspace RANDONEBIT. Such random objects once created, they can be roughly represented like in Figure 1.1.1 shown in the previous chapter. Such random objects, like the groups shown in Figure 1.1.1 of the previous chapter, can be created by loading ASPL with the RANDONEBIT workspace. You will start ASPL by loading the RANDONEBIT workspace: # aspl -wsname RANDONEBIT -groupingclass BITGROUP
# aspl RANDONEBIT
At the ASPL prompt we will replay the four operations of the previous chapter.
Instruction      Operation
-----------    -------------------------
gU v1 v2 v3    get the set union considering the subrgoups and elements
g& v1 v2 v3    get the set intersection considering the subrgoups and elements
g\ v1 v2 v3    get the set difference considering the subrgoups and elements
gP v1 v2 v3    get the subgroups and the elements partitions
Issue the similarity operator at the prompt to get the similarity between the three datasets represented by v1 v2 v3.
It is possible to get their set alignment by typing f%U
Set alignment operators or sequence operators are these mnemonics where % appears as the second symbol in their names.
A more interesting example in creating random groups, subgroups, subsubgroups, and elements is given in the sample workspace RANDONEBITMIX. In this workspace the variable mg123 represents datasets for three mixed groups that have been created randomly. In the previous chapter, in the section "ASPL Symbolic Shemes and Colors", we used a partial view displaying the groups intersection for the variable mg123. Here you can follow a more detailed view of the sample workspace RANDONEBITMIX shown in the following terrminal.
terminal for example: RANDONEBITMIX Sample Workspace
It is possible to show the alignment between two datasets. The command f%U g1 g2 displays the alignment of the elements of the group represented by g1 and g2. The following figure shows such alignment:
Note: mix-f%Ug1g2.png
Set operators where the symbol % appears as a second charater in their mnemonic are called seqops and they are explained in the section "Sequence Alignment Operations" of this chapter.
■ The CRAPTABLE Workspace
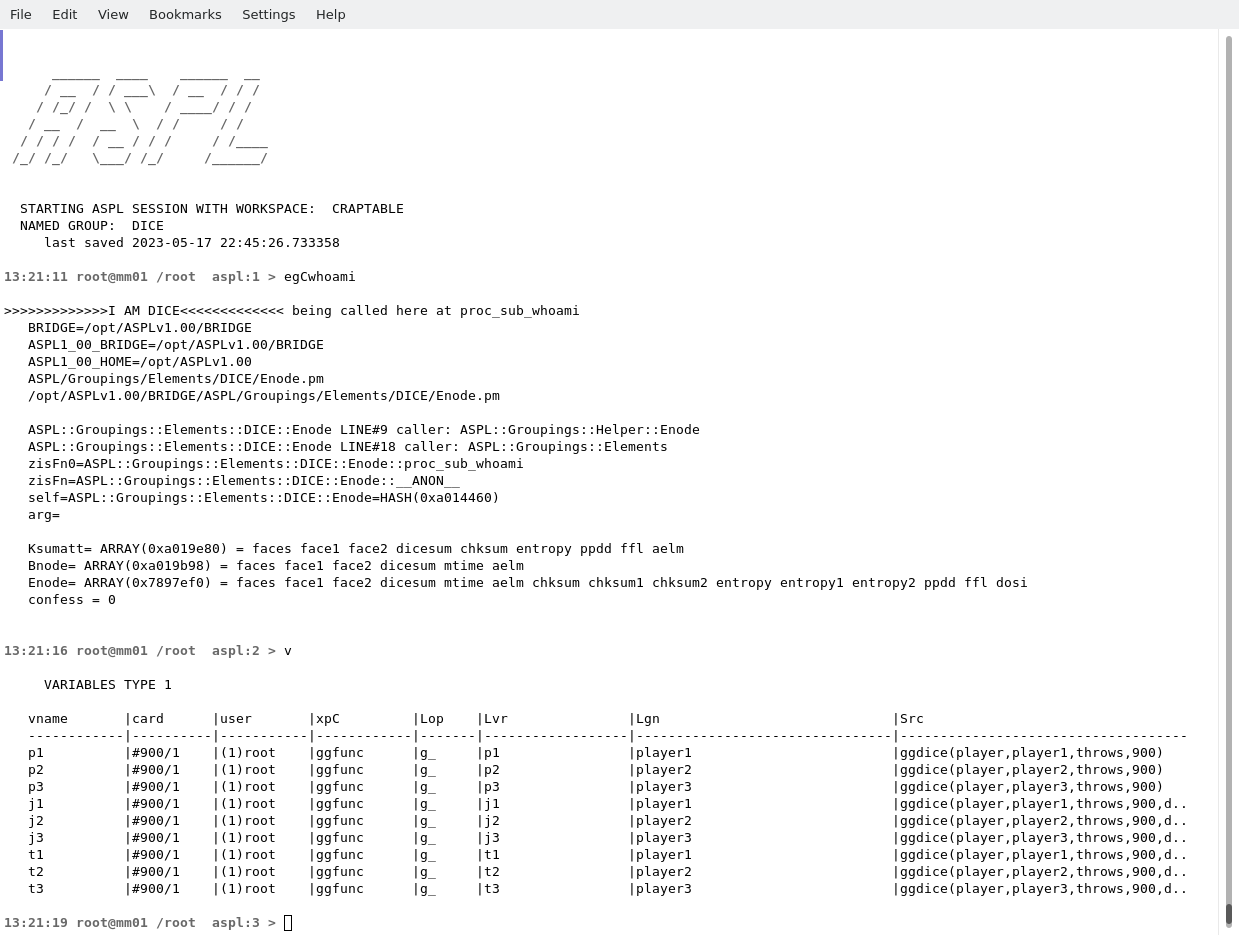
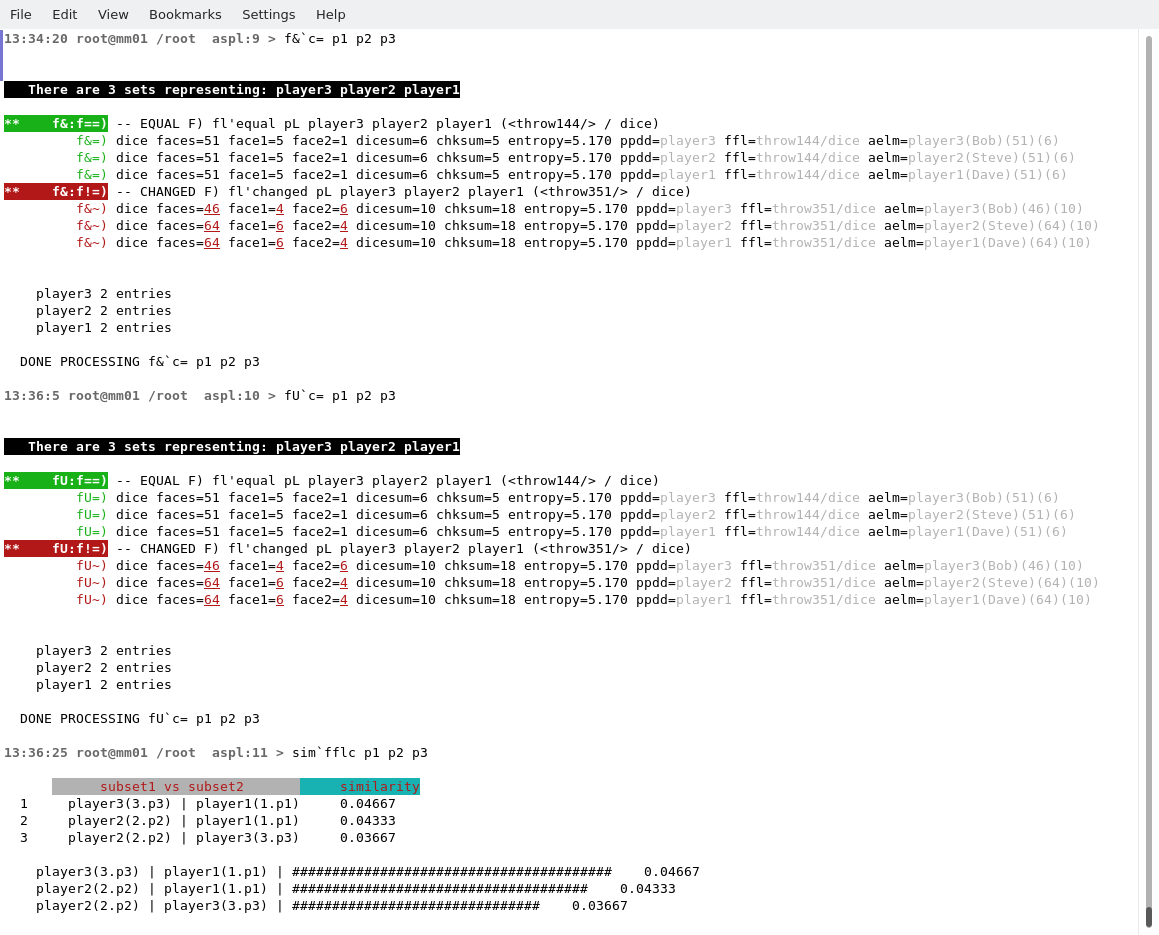
The CRAPTABLE workspace shows a simulation of three players tossing dice on a crap table. In this simulation we will show when the three players have the same outcome: either in the sum of both dice tossed, or in a perfect match for both faces of the dice.Start ASPL by loading CRAPTABLE workspace whose grouping class is DICE:
# aspl -wsname CRAPTABLE -groupingclass DICE
# aspl CRAPTABLE
Note: ASPL Started with CRAPTABLE craptable-v.png
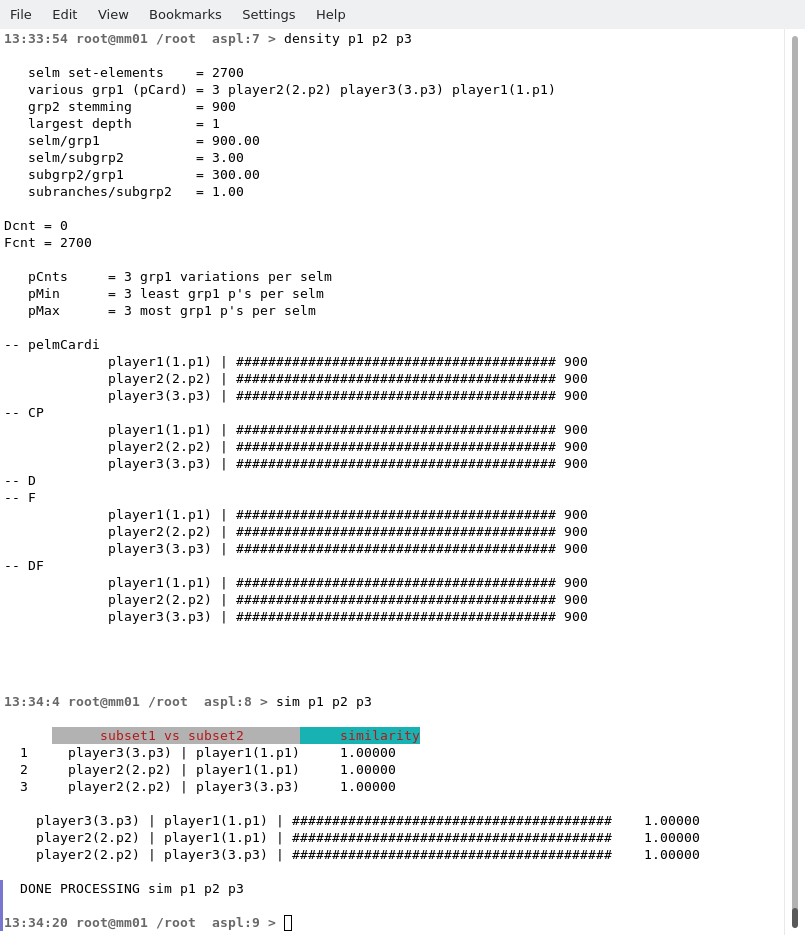
Getting the density of the p1, p2, and p3, figure FFFF shows that all three players datasets have the same density, and so is their similarities because here the elements represent the throws of the players.
Note: CRAPTABLE density p1 p2 p3 craptable-density.png
Let's include a predicate to find out when all three players get the same outcome. In other words what are the throw numbers (if any) when all three players got the same sum.
Note: CRAPTABLE Dice have same sum for p1 p2 p3 craptable-chksum.png
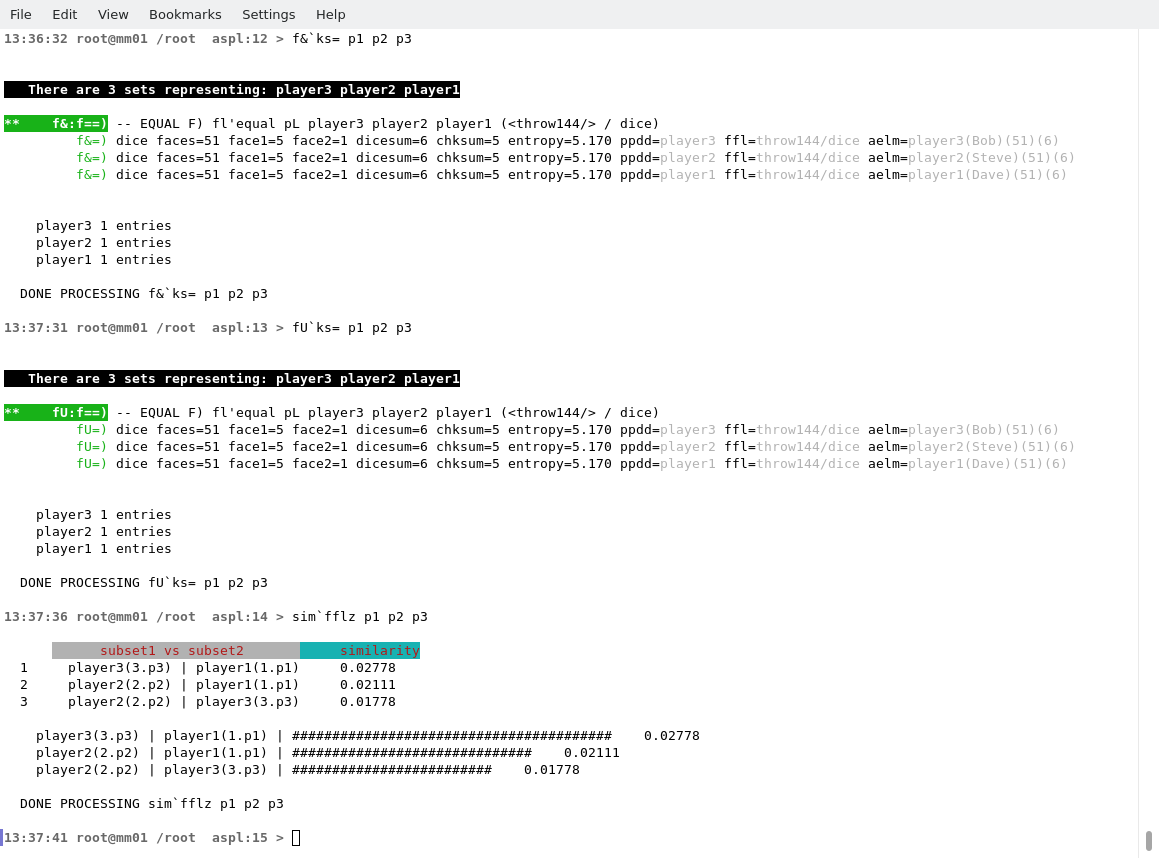
To find the throw numbers (if any) when all three players got the same face on both dice, we will use the ks vector as a predicate. The result is shown in the figure below:
Note: CRAPTABLE Dice have same faces for p1 p2 p3 craptable-ks.png
You want to see all the throws and when all three players get the same outcome (hilighted in green), then just omit the predicate from the command:
aspl> f& p1 p2 p3
You want to see all the throws of players p1 and p2, and see the dice matched:
aspl> f%&`ks= p1 p2
You can do your own simulation in CRAPTABLE without even saving anything in set variables. Use the following commands to run another simulation, but this time you will save the objects on the stack.
  aspl -wsname CRAPTABLE
  ans
  ggdice(player,player1,throws,900)
  ans
  ggdice(player,player2,throws,900)
  ans
  f&`ks=
  pop
  f&`c=
  pop
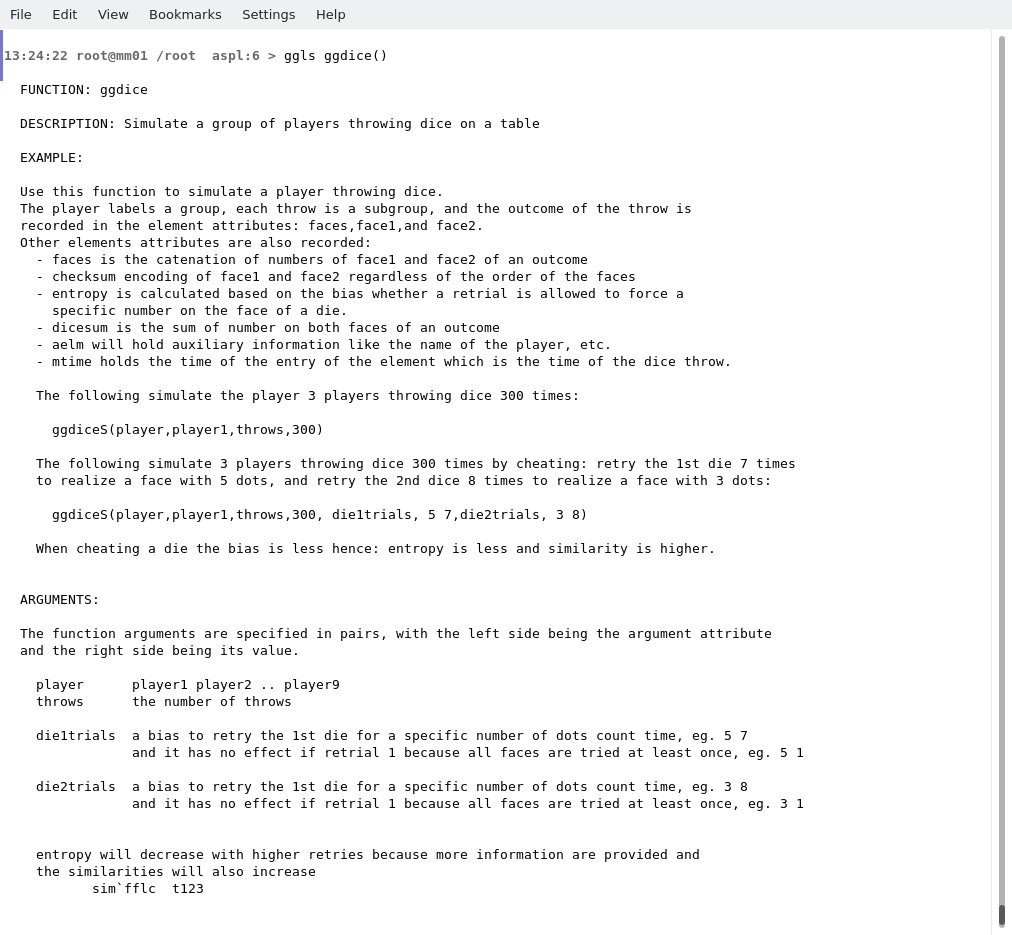
The function ggdice() is the grouping function and its description can be viewed by typing at the ASPL prompt:
aspl> ggls ggdice()
Note: CRAPTABLE ggls ggdice() craptable-ggdice.png
You can quit ASPL anytime without saving anything to the workspace by pressing CONTROL-C.
■ Basic Set Operations
The following are the basic set operators: f& d& g& fU dU gU f\ d\ g\ fD dD gD fP dP gP
The first letter depicts the subject on which the operation will take place, and the second letter depict the type of operation.
f, d, g refer to the elements, subgroups, and group respectively. The subject denoted with 'g' is for groups and that includes both of its subgroups and its elements.
The type of operation can be one of U, &, \, D, and P refering to union, intersection, difference, symmetric difference, and partition respectively.
■ Sequence Alignment Operations
Set operators that have the symbol % as the second character in their mnemonic are called sequence operators. In ASPL these are termed seqops. These seqops do not return any value, but they are merely used to display the alignment between datasets, hence allowing the user to do analytical and comparative obersvation on the data.
The choice for the symbol % is adopted in ASPL as the sequence alignment symbol. While this symbol is sometimes used as the quotient symbol in old mathematics, ASPL uses it as the sequence operator to align two sequences derived from their corresponding datasets. This symbol appears as the second characters in all sequence operators. Sequence operators starts with one of the following three charaters f d g (depicting the subject on which the operation will take place), then followed by the alignment symbol %, then followed by the symbol depicting the type of operation such as one of & U \
    +------ % is the sequence alignment symbol between two datasets
    |
    v
   f%&
   ^ ^
   | |
   | \___ operation is the intersect
   \_____ subject f is the element
Just think of % as a circled dot above the solidus (/) symbol and another circled dot below it, where the first (upper dot) corresponds to the first set and the second (lower dot) corresponds to the second set. ASPL will then display the alignment showing the elements of first set in the upper line, and the elements of the second set in the lower line.
These three letters seqops are typically followed by two set variables and they deliver on displaying the sequence alignment of the first two variables that follow them. When the seqop is issued by itself on the command prompt and not being followed by any operands, then the operation is performed on the object that is located on the top of the stack.
For example to compare two directoriies:
aspl> ggdir(dir,/tmp/aa2)
aspl> ggdir(dir,/tmp/aa1)
aspl> ans
aspl> f%&
The three letters seqops can be extended by suffixing them with one of the following letter & U \ to form a four letter seqops. These four letters seqops are called mediated-seqops and are followed by three set variables, and the alignment is always performed on the first two datasets after being mediated with the mediating operation (depicted by the last letter) with the third dataset. For example:
aspl> f%&U a1 a2 a3
aspl> f%&& a1 a2 a3
■ Interrogating a Set Variable
The choice for the symbol ? is adopted in ASPL as the interrogation operator. This operator, when followed by a set variable, causes ASPL to interrogate the source that resulted in creating the variable.
A set variable is created when you assign a value to it; the value is an object that represents a dataset. The set variable is stored in ASPL symbol table that you can display by typing the symbol v.
Each set variable represents a dataset that originated from some kind of source: a function, a setadic statement, a grouping expression, etc. The source is maintained in each variable, and you can view it by displaying the symbol table. In this example, we load the workspace RANDONEBIT and display the symbol table:
01:20 root@mm01: ~ #  aspl -wsname RANDONEBIT -groupingclass BITGROUP

      ______  ____    ______  __
     / __  / / ___\  / __  / / /
    / /_/ /  \ \    / ____/ / /
   / __  /  __  \  / /     / /
  / / / /  / __ / / /     / /____
 /_/ /_/   \___/ /_/     /______/


  STARTING ASPL SESSION WITH WORKSPACE:  RANDONEBIT
  NAMED GROUP:  BITGROUP
     last saved 2024-02-13 01:09:15.855164

1:21:19 root@mm01 /root  aspl:1 > dm 1

  DISPLAY MODE SET TO 1

1:21:25 root@mm01 /root  aspl:2 > v

     VARIABLES TYPE 1

   vname       |card      |xpC         |Lgn                             |Src
   ------------|----------|------------|--------------------------------|------------------------------------
   v1          |#31/1     |ggfunc      |g1                              |ggbitsubgS(gstart,1,gcount,1,dmin,..
   v2          |#49/1     |ggfunc      |g2                              |ggbitsubgS(gstart,2,gcount,1,dmin,..
   v3          |#28/1     |ggfunc      |g3                              |ggbitsubgS(gstart,3,gcount,1,dmin,..
Notice the Src column showing the source function that created the variable. The variables have been created by sourcing the function ggbitsubgS() and you can view this function by typing ggls ggbitsubgS() at the ASPL prompt. This function creates random number of groups, subgroups, and elements. Calling this function at different time will result with different datasets. So let's see how to interrogate the set variable.
You can interrogate a set variable by using ? operator and ASPL will reiterate the process that sourced this variable; then ASPL will compare the previous data to the sourced data: if there is any change in the sourced data then ASPL updates the variable with the newly sourced data. When a variable is being updated, its old data is being archived and you can use the @ operator to view a variable and its archived data.
In the previous section "The RANDONEBIT Workspace" we showed .. you can
■ Similarity Operations
Similarity is a cosine based calculation of the angle between vectors in a plane. Setting aside its implementation, ASPL provides the similarity or its abbreviation sim as a command to calculate the similarity between your datasets. In this example, we will load the RANDONEBIT and calculate the similarity between the randomly generated groups in the workspace:
# aspl -wsname RANDONEBIT -groupingclass BITGROUP
aspl> sim v1 v2 v3
display the similarity between v1 v2 and v3
aspl> simi123 = sim v1 v2 v3
assign the similarity calculatiion to COS variable simi123
aspl> c
display the COS symbol table
aspl> ?c simi123
interrogate the similarity variable simi123
aspl> ??c simi123
really interrogate simi123
aspl> c sorted
display COS symbol table in sorted mode
aspl> v sorted
display the symbol table in sorted mode
aspl> @c simi123
display the archived COS variables for simi123
aspl> @@c simi123
display the dependencies for COS variables simi123
aspl> quit
leave ASPL without saving the workspace RANDONEBIT
this will cause sourcing the dependendies variables and may also result in updates in the sourced variables.
Remember that ASPL stores the similarity variables in its COS symbol table that you can display its contents anytime by typing any of the following commands at the ASPL prompt: c C cos COS
■ ASPL Workspace
ASPL stores its symbol tables in the worspace-directory. This directory is the folder where ASPL saves any of its workspaces. Since each workspace has its own name, then you can have many workspaces saved in the same worspace-directory. In addition, you can create as many directories as you want and copy workspaces into them, then let ASPL load the workspaces from any of them.
The default workspace directory loaded by ASPL is defined in the environment variable ASPL_CLI_CONFIG. You can view this environment variable by typing on the shell prompt:
  # echo $ASPL_CLI_CONFIG
  /root/.aspl/WSP/WORKSPACES1,TRIVIAL,10,10,10,1000,30,2,0,0,0,0
The worspace-directory is the first entry in the comma separated string of the variable ASPL_CLI_CONFIG. In this example, it is /root/.aspl/WSP/WORKSPACES1 directory.
Also after starting ASPL, you can issue any of the following commands at the ASPL prompt to reveal the workspace directory:
aspl> wls
(list the workspace directory)
aspl> wlls
(long list the workspace directory)
aspl> ll ~wsp
(list the workspace directory)
aspl> cd ~wsp
(cd to the workspace directory)
aspl> ~wsp
(cd to the workspace directory)
aspl> envvar
(pretty print ASPL_CLI_CONFIG)
This last command prints where ASPL loaded its workspace repository. It is the first entry in the environment variable ASPL_CLI_CONFIG, and in this particular example it is from /root/.aspl/WSP/WORKSPACES1.
CURRENTLY FROM WITHIN THE APPLICATION:
--------------------------------------
ASPL_CLI_CONFIG=/root/.aspl/WSP/WORKSPACES1,TRIVIAL,10,10,10,1000,30,2,0,0,0,0
                             |                 |     |  |  |   |   | | | | | +--> synchronize workspace container
                             |                 |     |  |  |   |   | | | | +----> make variables global
                             |                 |     |  |  |   |   | | | +------> persist data changes
                             |                 |     |  |  |   |   | | +--------> assign once
                             |                 |     |  |  |   |   | +----------> display mode
                             |                 |     |  |  |   |   +------------> wksp keep, keep lessons
                             |                 |     |  |  |   +----------------> history size
                             |                 |     |  |  +--------------------> unswer size
                             |                 |     |  +-----------------------> enswer size
                             |                 |     +--------------------------> answer size
                             |                 +--------------------------------> workspace name
                             +--------------------------------------------------> workspace directory


The above variable is the current ASPL_CLI_CONFIG variable that is being used by ASPL client.
Some values may have been changed. Compare them to the initial values as set in the shell.

AS BEING SET IN THE SHELL:
--------------------------
ASPL_CLI_CONFIG=/root/.aspl/WSP/WORKSPACES1,TRIVIAL,10,10,10,1000,30,2,0,0,0,0
                             |                 |     |  |  |   |   | | | | | +--> synchronize workspace container
                             |                 |     |  |  |   |   | | | | +----> make variables global
                             |                 |     |  |  |   |   | | | +------> persist data changes
                             |                 |     |  |  |   |   | | +--------> assign once
                             |                 |     |  |  |   |   | +----------> display mode
                             |                 |     |  |  |   |   +------------> wksp keep, keep lessons
                             |                 |     |  |  |   +----------------> history size
                             |                 |     |  |  +--------------------> unswer size
                             |                 |     |  +-----------------------> enswer size
                             |                 |     +--------------------------> answer size
                             |                 +--------------------------------> workspace name
                             +--------------------------------------------------> workspace directory


  tilde expansion  explanation                                    directory
  ---------------  ---------------------------------------------  -------------------------------------
  ~pwd             Parent process working directory               /root
  ~home            ASPL home directory                            /opt/ASPLv1.00
  ~shared          ASPL shared directory                          /opt/ASPLv1.00/shared
  ~scripts         Scripts directory (beta v2)                    NO SUCH DIRECTORY: ~scripts
  ~etc             ASPL etc directory                             /opt/ASPLv1.00/etc
  ~tmp             ASPL tmp directory                             /root/.aspl/tmp
  ~bin             ASPL bin directory                             /opt/ASPLv1.00/bin
  ~wsp             ASPL Workspace directory                       /root/.aspl/WSP/WORKSPACES1
  ~gg              ASPL Grouping Functions directory (loadable)   /opt/ASPLv1.00/BRIDGE/ASPL/GGs
  ~ggs             ASPL Grouping Functions directory (loadable)   /opt/ASPLv1.00/BRIDGE/ASPL/GGs
  ~feeder          Tied Attributes directory (loadable modules)   NO SUCH DIRECTORY: ~feeder
  ~geosubs         GEO contextual set operation modules           NO SUCH DIRECTORY: ~geosubs
 ** You can navigate to any of these directories within ASPL, just type its tilde-expansion at the ASPL prompt followed by ENTER.
 ** To list the files in any of these directories within ASPL, just precede its tilde-expansion with ll,lls,llt,lltr,lld, or llsdr.
 **     the ll and lls are the same, llt list files by time, lltr files by reverse time, lld list w.o. extending directories
 ** To change directory to the directory known to a tilde-expansion just type chdir followed by the tilde-expansion.
 **     chdir to ~ggs: chdir  ~ggs
 **     chdir to ~ggs: ~ggs
 **     go back to parent directory: chdir  ~pwd
 **     go back to parent directory: ~pwd
 ** To print the directory tree known to a tilde-expansion just type tree or treed followed by the tilde-expansion.
 **     for example display the tree (including files)  of GGs functions: tree  ~ggs
 **     for example display the tree (only directories) of GGs functions: treed ~ggs
 ** NOTE: the ~feeder directory is only available if the group attributes are tied to real time UNIX device.
 ** NOTE: the ~geosubs directory is only available with GEOmetric element grouping class.

  tilde expansion  explanation                                    file
  ---------------  ---------------------------------------------  -------------------------------------
  ~colorsfile      Colors configuration file                      /opt/ASPLv1.00/.aspl/etc/colors.conf
  ~emailsfile      Email groups file                              /root/.aspl/etc/emailspool
  ~ddmfile         DDM configuration file                         /opt/ASPLv1.00/etc/ddm.conf
  ~shallowed       Shallowed set operation processors module      /opt/ASPLv1.00/.aspl/etc/ShallowMatches.pm
  ~asplconf        ASPL configuration file (sessions timeout)     /opt/ASPLv1.00/etc/aspl.conf
 ** To edit any of these files within ASPL you can specify its tilde-expansion at the ASPL prompt, or just edit it in another terminal.

THE FOLLOWING ARE THE EXPORTED ASPL ENVIRONMENT VARIABLES:
----------------------------------------------------------

ASPL1_00_BRIDGE=/opt/ASPLv1.00/BRIDGE
ASPL1_00_HOME=/opt/ASPLv1.00
ASPL1_00_PROMPT='prompt:{tm} {u}@{h} {cwd}  aspl:{no} > ;promptcolor:bold_black;logocolor:bold_black;loadcolors:colors3'
ASPL1_00_TMP=/root/.aspl/tmp
ASPL_CLI_CONFIG=/root/.aspl/WSP/WORKSPACES1,TRIVIAL,10,10,10,1000,30,2,0,0,0,0
BASH_EXECUTION_STRING='echo;set | grep ASPL'
PATH=/tools:/tools/nailsutil:/root/.local/bin:/root/bin:/usr/local/sbin:/usr/sbin:/usr/local/bin:/usr/bin:/bin:/opt/ASPLv1.00/bin:/opt/ASPLv1.00/shared:/root/.aspl/scripts:/opt/ASPLv1.00/BRIDGE/bin:/opt/ASPLv1.00/bin:/opt/ASPLv1.00/shared:/root/.aspl/scripts:/opt/ASPLv1.00/BRIDGE/bin


EDITOR:  "vi "
      YOU CAN CHANGE THE EDITOR. FOR EXAMPLE,
        TO USE "vim" EDITOR:  export ASPL_EDITOR=vim
        TO USE "joe" EDITOR:  export ASPL_EDITOR=joe
        TO USE "jpico" EDITOR:  export ASPL_EDITOR=jpico
        TO USE "emacs" EDITOR:  export ASPL_EDITOR=emacs
      YOU NEED TO EXIST AND EXPORT ASPL_EDITOR.
      ASPL DEFAULT EDITOR IS "vi"

      THE EDITOR IS DISABLED IF PAGING IS ON.


PAGER:
  The current pager is "more"
  The pager is disable by default, but you can toggle it with: paging 1
  and turn it off with: paging 0

HISTORY:
  The history of any ASPL workspace can be recalled with the "hs" command.
  You can grep the history or the currently loaded workspace, for example:  hs grep somestring

  The current history of a session can be recalled with the "h" command.
  The current history of a session is not being saved unless the workspace is saved with the "save" or "bye" command.

  At the ASPL prompt, you can display the history of all workspaces can be displayed by typing "hsall", and
  you can grep the history of all workspaces for somestring by typing "hsall grep somestring"
  aspl> hsall

  On the UNIX shell prompt you can also display the history by using any of the following commands:
  # asplcmd hsall
  # aspl -verb hsall
  # asplcmd hsall | grep somestring

QUICKLY LOOKING INTO A WORKSPACE:
  On the UNIX shell prompt you can type the description of a workspace RANDONEBITMIX
  # asplcmd "load RANDONEBITMIX; description"
  you can type the history saved of a workspace RANDONEBITMIX
  # asplcmd "load RANDONEBITMIX; hs"

WORKSPACE:
  To quickly list the workspace directory used by ASPL for your current configuration, type on the UNIX prompt:
  # asplcmd wls
  # asplcmd wlls
  # asplcmd "wls sort by name"
  # asplcmd "wls sort by grouping"
  Start ASPL in verbose mode to view the directories used by ASPL

  To print the loaded workspace used by ASPL while being in session, this will also show the uptime
  aspl> wid
  Typing the following command at the shell prompt will display the workspace then exit ASPL
  # asplcmd "load RANDONEBITMIX; wid"
  The TRANSIENT workspace is a temporary memory space used by ASPL for its default command:
  # asplcmd wid

  Delete a workspace using the wrm command
  aspl> wrm WS1JUNK
  or on the UNIX prompt
  # asplcmd "wrm WS1JUNK"

  You can always duplicate a workspace using the save command
  here we start ASPL with WS1 workspace
  # aspl WS1
  we issue some command setting a123 set variable
  aspl> a123 = gU a1 a2 a3
  we save the current workspace to WS1JUNK
  aspl> save WS1JUNK
  saving the workspace does not mean ASPL will load it, wid will show that WS1 is still being used
  aspl> wid
  we quit (without saving WS1 workspace) and restart ASPL with WS1JUNK
  aspl> quit
  # aspl WS1JUNK


WHICH:
  ASPL has a colorful pretty print "which" command.
    aspl> whichxX+iR *aspl*group*
  It is also available at the UNIX shell prompt as the "whichma" command:
    # whichma xX+iR "*aspl*group*"
  and even build a tree and walk its directories:
    # ALTERNATE_EXPANDEDPATH=$(pathedtrees -dir /opt/ASPLv1.00/BRIDGE/ASPL) whichma xX+iR "aspl*/Feeder*pm"
  For more about ASPL "which" command, or it shell equivalent whichma-call-it "whichma" command, type "whichma" at the shell prompt.

grepls:
  The "grepls" command is used to grep somestring in the files of a directory: grepls TRIVIAL /opt/ASPLv1.00/BRIDGE/ASPL/GGs/*

WORKSPACE:
  The current workspaces repository is "/root/.aspl/WSP/WORKSPACES1"
  The currently loaded workspace is "TRIVIAL"

VERBOSE:
  Start ASPL with -verbose option to display its startup.
  If a workspace has been already saved, then you can quickly start ASPL by loading it, eg. to load TRIVIAL:
  # aspl TRIVIAL
  # aspl TRIVIAL -verbose

The ASPL intepreter is a pure PERL implementation that is build on top of the UNIX system
and it uses the PERL virtual machine in processing its statements.

Thank you for using ASPL.
COPYRIGHT 2024 by Bassem W. Jamaleddine
